How to photograph Christmas tree lights like a pro!
Topic: Photography Tutorial
Time Investment: 4 Minutes
Suggested Product: All-in-One Contract Bundles
“It’s the most wonderful time of the year…to play with lights, cameras, and a little bit of action! Corny huh? Nah this is actually quite fun!
We’re going to go step-by-step to learn the different methods of shooting Christmas tree lights. In a dimly lit room clear all distractions away from your tree or move in some Christmas related details to set the scene.
The level of lighting in the area will impact the results of the light coming from the tree and the mood of the photograph.
Set it so that the light is akin to a nice-fireside-with-a-hot-cocoa-while-you-listen-to-Michael-Buble-sing-Blue-Christmas-and-look-at-the-tree-type-of-feel. Got it? Good! Let’s roll!
Here is what you need:
- camera that allows you to manually manipulate settings
- lens
- a lit up Christmas tree
- tripod (or something steady like a table)
- patience (This is the most important)
#1 Set up your tripod
Don’t worry if you don’t have a tripod, I used a bar stool on a box for my tripod for these shots! The most important aspect is a long shutter speed time, hence the need for a tripod. This is our first line of defense against any movement obstructing the pretty starbursts we are aiming to achieve.
#2 Set up your delay timer or remote
The second line of defense against movement is the use of a delay timer or remote. This allows for the camera shutter button to be pressed but a delay between pressing and the actual taking of the photograph. This is critical for the longer shutter speed photographs as any slight movement will make the lights all scrambled and the tree blurry. If you have a remote you could also use the remote function. For the photos in this tutorial, I used a 5 second delay to make sure there was absolutely no movement.
#3 Set your baseline settings
In order to get the little “starbursts” your baseline settings should be f/22, 25 seconds, and ISO 64 (Tree #1 picture). Some lenses are unable to reach f/22, so push your aperture to the highest number you can achieve (i.e. close it down). Also, aim to have your ISO as low as it can go as we are aiming to capture the “light”.
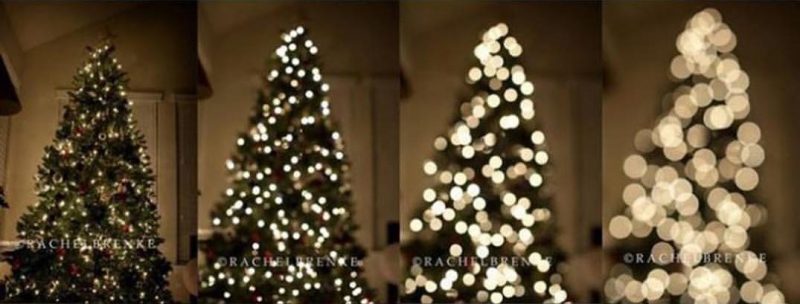
#4 Play with the settings
Opening up your aperture, which will also decrease your shutter speed. As the aperture opens and the shutter speed increases, the “starbursts” of the Christmas tree lights will reduce in size and appearance.
#5 Turn off auto focus & make some bokeh!
Now, it is time to completely adjust your settings as we’re aiming for bokeh and not the starbust action. Push your aperture as wide as it will go, keeping it mind you may need to increase ISO a little bit. You also don’t need a long shutter speed for this picture, you want to ensure the photograph is properly exposed after setting up the aperture and ISO.
Have a Merry Clickin’ Christmas!
Share this
Popular posts